DIY
How to Install a Controller on a Golf Cart
08
Mar
Mar
Ryan Fenters Installs a Navitas Controller
Previously on the Fentertainment channel, we added a Plum Quick Bandit to our 2014 club car. It took the speed from 12 to 23 miles per hour. The second video of the series, we added a lift kit and some wheels and tires. The tires and wheels are made by TREX, 14-inch wheels, 23-inch tall tires. The All Sports lift kit is American-made and it’s a six-inch lift kit. It took our speed from 23 to 27 miles per hour.
On today’s video, we are going to be installing a Navitas controller. This controller gives us more speed, more torque, more security and has many on-the-fly adjustable settings. It has a programmable app for your phone as well so be sure to check it out.
This is the Navitas dash controller. This is the cable that goes from the controller to the stock harness on the golf cart. Since we went with the Plum Quick Motor, we decided to go with the DC motor controller on here.
This is the 600-amp controller we’re going to be installing on my 2014 Club Car Precedent and it’s the Excel model. One reason I went with Navitas is because I’ll be able to use my phone through Bluetooth and also have dash controls. This is the DC motor controller, 48-volt, 600-amp, so let’s get this one on the golf cart.
Getting Started
In order to get started, make sure the golf cart’s in the off position and go ahead and set your park brake. Next, we’re going to go ahead and remove the seat base, lift up and pull straight up and you can pull the seat off the golf cart.
Be sure to turn the golf cart into the tow mode. I’m going to go ahead and remove the positive and the negative battery cables. Next, we’re going to remove this T40 bolt as this is going to be where your controller will be.
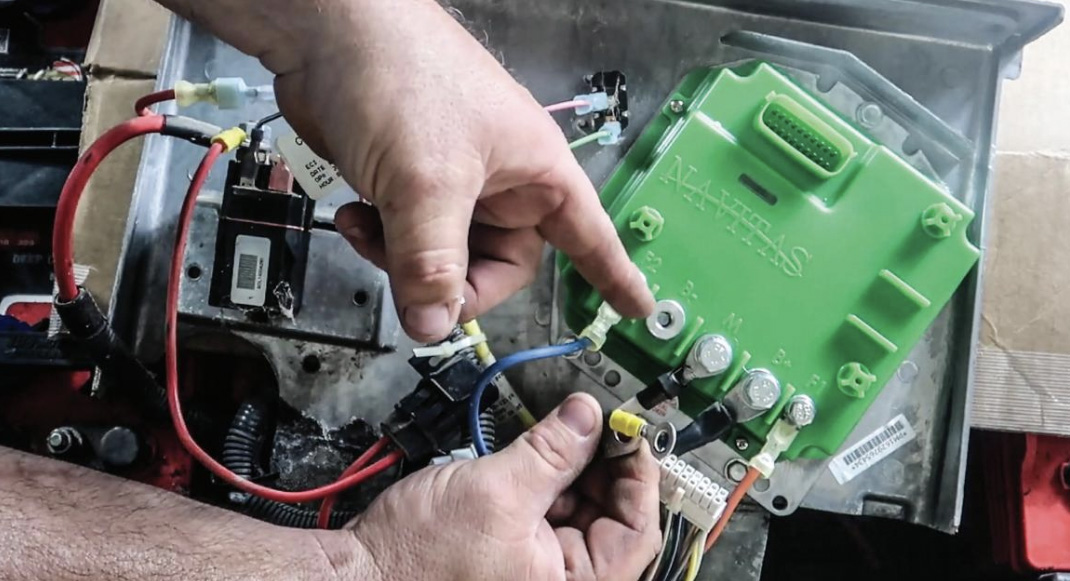
We’re going to get a piece of cardboard and lay it down here, so none of this touches. Now would be the good time to go ahead and take a picture of the wiring on the controller here so we know what we have.
Once we look at the controller and take a picture of it, we know where to match the wires onto the new controller. We can go ahead and disconnect the harness and pull off the wires.
Removing Existing Controller
To remove the controller away from the panel, we’re using a 3/8 socket. The top bolt does not have to come out, it just slides off. To install the new controller, we just slide the top into that bolt and the holes are already there for the existing bolts. I’m using an impact to tighten the controller to the mounting plate, but you do not want to use an impact to tighten the wires to the controller, only for removing off the old one.
The orange wire is going to the F1 connector and the blue wire is going to the F2 connector. I’m using a13-millimeter socket wrench to loosen these up.
Before we mount the controller, we’re going to take some rubbing alcohol and clean it up. We want to have this free and clean of any kind of chemicals, so the double-sided tape will stick the best.
Mounting the New Controller
In order to remove the dash piece away from the dash itself, you’re going to have two T30s and one T15. Once you have those bolts removed, you can now remove the access cover. Since we already have the controller mounted, we’re just going to take the wire and run it down and behind the dash.
Now take the cable and hook the big lead up. It’s the main harness. The 8-pin is going to be for the remote control that’s on the dash. Now I’m going to take all the slack here and put it into a circle and wire-tie it to get majority of the slack out, then I’ll do a final wire tie after it’s all put together.
Since we have everything else installed, we’re going to remove the cover. Remember these two pins come out and the cover comes up.
We’re just going to take it from this middle section up and over about three inches down, and try to make a big square here. We’re going to leave this cover here, so you can see exactly what yours is going to look like.
Once we have everything placed back onto the controller, including the harnesses, we’re going to place it back into the golf cart. Let’s see if the cutout we made is big enough.
As you can tell, the cutout we made is large enough. Now, we just need to go ahead and take this top piece, push it down and bolt it into place.
We can now go ahead and install our power and ground cable and put it back into “Run” position. We’ll go ahead and place the seat back on.
Setting Up the App
Now that the controller is installed on the cart, we need to install the motor app. I have the Navitas dealer app on my phone and will go ahead and select the controller. We’re going to go to the download screen once the app opens and select the motor you have on the golf cart. Mine is a Plum Quick Bandit and the firmware is going to load.
It usually takes about five minutes to fully load and it’s ready to go. We need to change our tire size and choose the type. Once selected click “Save Changes” and turn the golf cart key off and turn it back on so it saves the setting.
The controller comes stock at 25 miles per hour in the four direction, 4500 rpm, Robbie Steen said 6500 for the Bandit. Hit accept and it’s good for 35 miles per hour. You can save changes and make sure to turn the golf cart off and back on the key switch to fully save it.
For reverse you can give it more speed or less speed. I gave mine less speed in reverse. I don’t need it to go that fast.
We already set the motor profiling to the Bandit. We did that on the download setting and it’s going to be the first thing you do. On the app itself, you have a green button that says “Unlock”. We press the button and it’ll turn red. While it is in the red position, you can now control the golf cart and lock it which is a security feature. The golf cart will not move and will only move again when we unlock it on the app.
The On-The-Fly Controller
The on-the-fly controller here that’s mounted on the dash has a couple of different features. You can adjust the speed and the acceleration even while the golf cart is moving as long as the switch is in the unlocked position. However, if the switch is in the lock position these settings cannot be changed.
The lock and unlock adjustability for the on-the-fly controller is perfect for families with kids or companies with employees. You can set this how you want it so no one can modify the settings while it’s in the lock position. Now, with this being said the top speed can also be limited in the app regardless of the on-the-fly position.
How do I like the system? I don’t like it at all. I absolutely love it and there’s so much on here that you can set up and adjust your golf cart to different ranges and settings.
I appreciate you watching and I’ll place links in the description below where you can find these controllers where you can find them at, they’re relatively cheap.
Remember, this is the entry-level controller and I have an entry-level Plum Quick Motor. I have 23-inch tires and a lift kit. I was able to hit 30 miles per hour on two-year-old batteries. The batteries need to be replaced and we might do something in the future.
—
Ryan Fenters is the founder of the popular YouTube Channel called Fentertainment. Ryan creates DIY videos of, in his own words… “dedicated to making, painting, building, modifying and fixing things…”
His golf-cart-related DIY videos are very informative and we thought it would be a good idea to transcribe them for you.
This is the third video in a four-part series where Ryan transforms a 2014 Club Car Precedent. Ryan shows us step-by-step how to install a Navitas controller.