DIY
How to Install a Golf Cart Lift Kit
08
Mar
Mar
Ryan Fenters of Fentertainment Installs a Lift Kit
Previously on the Fentertainment channel, we yanked the motor off of our 2014 Club Car Precedent and sent the motor to Plum Quick where they rebuilt the motor, painted it purple, and called it a “bandit”. We reinstalled it and went from 12 mph to 23 mph.
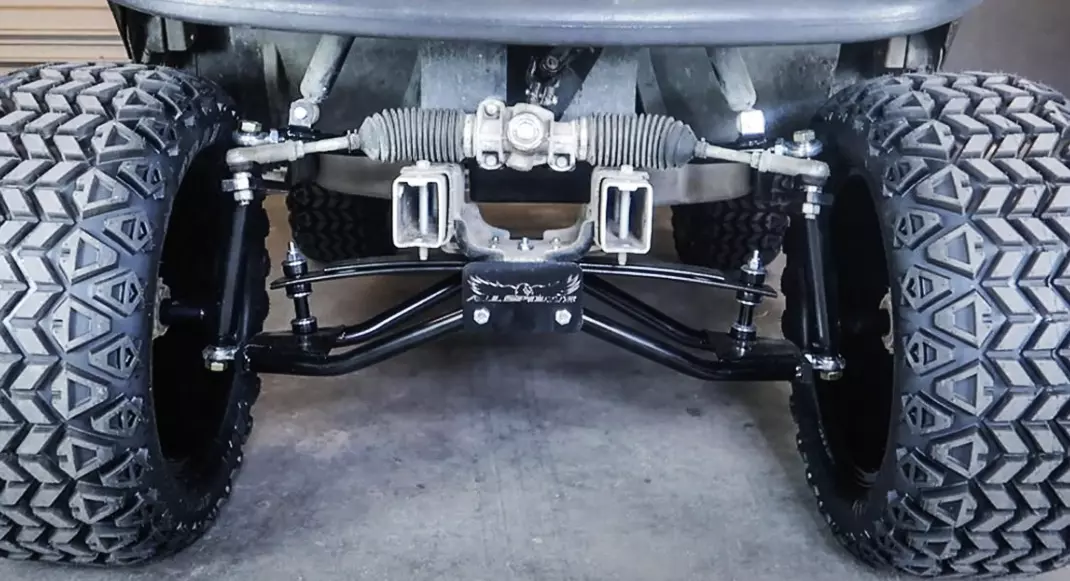
Today we’re installing an All Sports HD 6-inch lift kit along with some Trex wheels and 23-inch tall tires from golfcarttiresupply.com.
My first measurement we are at 8 inches from the ground and at the side of the lower portion of the roof we’re at 64.5 inches tall. The back portion, we’re at 7.5 inches tall and the back wheel well, we are at 19 inches tall. The front-wheel well, we’re at 19 inches tall. This gives us an idea of how much the lift kit and the wheels and tires adds to the height of the golf cart.
Unpacking All Sports Lift Kit
We have two boxes here from All Sports. These are the driver and passenger spindles. These are the upper control arms, one per side, and they have heim joints as the top mounting point to the spindles and there’s also heim joints at the bottom portion of the spindles as well. This is your main lower portion of the kit. This is all the hardware. These are the bushings for the rear springs. This is the four-leaf pack heavy duty spring. In order to get started, we’re going to switch the golf cart to the off position and set the parking brake.
Installation
Place the golf cart in the tow mode and pop the wheel caps off and use a floor jack to jack the cart up. Place jack stands underneath the frame rails behind both of the front wheels and tires and release pressure from the floor jack onto the jack stands.
Use a 19-millimeter socket and impact to remove the factory golf cart lug nuts, wheels, and tires. To remove the front bumper use a 10-millimeter socket and a 13-millimeter wrench.
There’s two bolts behind the bumper on the frame rails and once removed the bumper will slide right off.
I use a 13/16 socket and an impact to remove the hubs. Remove the tie rod with a 17-millimeter wrench to hold the tie rod in place while we use the impact and an 18-millimeter socket to break it loose. Thread the nut back on to the tie rod.
I use a soft blow hammer to gently pry the tie rod out of the spindle and repeat on the other side and then remove the steering rack by removing the bolts with a 13 millimeter socket. You may need to use a pry bar to help give some leverage towards the steering rack.
Remove the lower shaft bolts and the upper control arm bolts with a 13-millimeter socket. You might need to pry the lower shocks away from the top of the spindles.
I use the 13-millimeter socket and the impact driver to remove the factory lower spring of the front suspension and remove the suspension altogether. Before we reassemble the golf cart lift kit, I lay all of my hardware on the ground and make sure everything is included.
In order to mount the bottom piece of the new lift kit, we’re going to use the hex bolts supplied with the kit along with the factory tow mount and these are going to go underneath the lift kit lower portion onto the frame.
Mounting Upper Control Arms
Next, we’re going to mount the upper control arms using the bolts that we removed previously and then use the supplied lift-kit hardware to mount the lower shocks and rack back to the golf cart. Use all the bolts that you used for the disassembly process to mount everything back.
Install the spindles on both sides. Be sure to use the hardware provided with the kit.
Also, be sure to mount the tie rod to the spindle. We need to remount the hubs that we took away from the factory suspension and we’re going to put the hubs on these new spindles and use the existing nuts that we used from the old suspension. Put the wheels and tires onto the golf cart, jack it up, and remove the jack stands. Done.
Now for the back… Lift the golf cart up, put some jack stands underneath the frame rails. Remove the rear wheels and tires. We first need to remove the nut from the shock on both sides, the lower nuts, and there’s going to be a bushing and a washer down there.
We’re going to retain those and put it back onto the shock for our next step. Next we’re going to remove the u-bolts from one side only because we don’t want the motor to tilt down because it’s so heavy.
There’s a pin underneath the brake cable with a little spring clip and we’re going to remove the spring clip up the pin and drop the brake cable.
On these leaf springs, this is a mono-leaf. From the center of the axle to the front here is longer than the center of the axle to the rear here to keep the wheel centered in the wheel well. Let’s get started installing the new springs. I’m going to take a 15-millimeter socket to remove the nut of the bottom of the shock. Put the shock up and put the nut back on to the shock itself and repeat on the other side.
Remove the clip from the brake cable. This is the pin that the clip slid into. Use a 16-millimeter to remove the stuck u-bolt. The brake cable is connected to this bracket here so be sure to leave it connected until the install is complete. We’re going to reuse this.
I have the floor jack underneath the golf cart and only supporting the axle on this side while we work and remove the leaf spring. The axle is not resting on the leaf spring so we can go ahead and remove it.
There’s one bolt here and one bolt on the front and will use a 10-millimeter socket to remove them. We’ll remove the nuts from the inner frame rail. Now, on the nut, there is a bracket that holds the brake cable. You might have to bend that down, so you can get your wrench on it before you go ahead and remove it from this side of the golf cart. It’s the same size, a 10 on the front, 13 on the back. Brake light cable is loose.
The leaf spring is going to come with the bushings removed.
This is considered a flip kit and looks like a block. It’s going to go between the axle and on the bottom of spring is a nut that fits in the center of the opening. Next, attach the top plate.
The u-bolts are going to mount perpendicular to the spring, not parallel. The block keeps the axle centered to the leaf spring. We’re going to jack the axle back up until it meets the block itself and put the bottom plate on the very bottom. That’s going to hold everything in place.
Next, we’re going to take place the break cable mount. Once you have the passenger side done, go ahead and repeat the process on the driver side.
Testing the Lift Kit
We took the golf cart for a spin and discovered some negative camber.
Whichever side you’re starting with, go ahead and remove that tire and where the golf cart is mounted on the hub, the hub is attached to the spindle. The spindle mounts to the upper and lower control arms with a bolt going through a heim joint. I like to screw the lower heim joint on the bottom all the way in and adjust the top heim joint out or in to correct the camber.
Now, once you have the wheel back on the golf cart and golf cart back on the ground, take your straight edge now and check the side against the ground and make sure it’s a perfect 90-degree angle. Just repeat the same process on the other side.
If you remember correctly, after we installed the Plum Quick Bandit motor the cart went 23 mph. By doing the lift kit and wheels and tires the cart was able to reach a speed of 27 miles per hour.
—
Ryan Fenters is the founder of the popular YouTube Channel called Fentertainment. Ryan creates DIY videos of, in his own words… “dedicated to making, painting, building, modifying and fixing things…”
His golf-cart-related DIY videos are very informative and we thought it would be a good idea to transcribe them for you.
This is the second video in a four-part series where Ryan transforms a 2014 Club Car Precedent. Ryan shows us step-by-step how to install an All Sports 6-inch lift kit.